

Hood Stripes
Installation Guide
Compatible Sets
Porsche 718 Spyder/GT4
"Weissach" Hood Stripe
Porsche 718 Spyder RS/GT4RS
"Weissach" Hood Stripe
Preparation
For a successful application, ensure the environment and surface are properly prepared. Give yourself plenty of room to work in.
Surface Cleaning
The vehicle surface must be perfectly clean before installation.
Ensure the target area is:
-
Clean and Dry: Free from moisture.
-
Smooth and Non-Porous to promote good decal adhesion.
-
Contaminant-Free: Completely free of oil, wax, ceramic coatings, grease or any other cleaning residues.
-
For newly painted vehicles, please allow at least 5 weeks for the paint to cure & outgas before applying any graphics
Recommended Tools
-
Application Squeegee (included)
-
Heat gun
-
masking tape
-
Scissors
Unpacking
-
Locate the ID number on the transfer tape of each graphic. Match these numbers to the installation instructions.
-
You may notice air bubbles between the graphic and the transfer tape. This is normal and does not affect the final application. Simply use a squeegee to gently push the bubbles toward the nearest edge.
Temperature
Humidity
Location
Between 15 °C and 25 °C
Work in low humidity
Indoors in a brightly lit area
S1
Hood Stripe
Pack Contents

Installation
⚠IMPORTANT - Please read carefully through this entire section before installing any graphics.
Material Layers
To ensure a perfect finish, our graphics are ‘sandwiched’ between two protective layers. The base release liner protects the adhesive until you are ready to apply, while the top transfer tape keeps the cast vinyl stable during installation. Please follow our guide to ensure you are removing the correct layer at the correct stage of the process.
Positioning and Alignment
Our graphics have been designed to take the guesswork out of placement onto the vehicle. We do this by perforation cutting our designs to key datum points featured on the original bodywork. These can be in the form of body creases, shut lines, trim edges or emblems. We also include outer tabs with peelable backings to help with provisional placement. In this section we’ll provide guidance on how to align each graphic with the existing bodywork.
S1 - Hood stripe
-
Loosely place the graphic on the hood to familiarise yourself with the general placement.
-
Remove the release liner backing from the outer tabs.


-
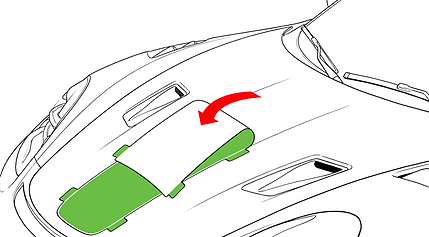
Use the image below for guidance on positioning. The rear edge of the top outer tabs should align with the rear edge of the hood. The sides of the graphic should align with the crease edges between the 2 Naca ducts.
⚠ ASSESS - Check over the positioning to ensure good alignment with the relevant bumper/decklid features. Tune placement with the outer tabs if needed.


-
Lift the top half of the graphic away from the hood and fold it back towards the crest, taking care not to crease the vinyl or lift the central outer tabs..
-
Peel the base release liner away from the graphic towards the central outer tabs.

-
Cut away the exposed release liner. Take care when cutting to avoid damaging the hood.
-
Unfold the graphic to its original position without letting it touch the bodywork.


-
Using the supplied application squeegee, gently apply the graphic to the upper half of the hood. Work in overlapping horizontal strokes, starting from the centre of the graphic - slowly working upwards and outwards.
⚠Maintain Tension - Keep the graphic taut and slightly elevated with your free hand, letting the squeegee pull the vinyl down

-
Once the top half of the graphic is successfully applied, lift up and fold over the remaining bottom portion.
-
Remove the rest of the release liner


-
unfold the graphic to its original position, but do not let it touch the bodywork.
-
Using the supplied application squeegee, gently apply the graphic to the bumper/decklid. Work in overlapping horizontal strokes, starting from the outer tabs and working outwards
-
⚠Maintain Tension - Keep the graphic taut and slightly elevated with your free hand, letting the squeegee pull the vinyl down onto the surface.


Finishing up
-
Carefully peel and discard of the top transfer tape. For best results, pull the tape back slowly at a sharp 180° angle (keeping it flat against the hood).
⚠ Troubleshooting - If any part of the graphic starts to lift with the transfer tape, stop, lay it back down, and reapply more pressure with the squeegee.

-
With the transfer tape removed, if you notice any bubbles in the graphic, apply gentle heat and use the the application squeegee to work them out to the closest edge.

-
On the hood edge, use a heat gun and your squeegee to carefully tuck and set the vinyl in position. Heat is important for “setting” the vinyl’s memory to its new shape, ensuring it will stay firmly in place without risk of peeling.

-
To ensure a permanent, long-lasting bond, we recommend post-heating the entire graphic. Evenly heat the surface of the vinyl to 90°C. This process ‘sets’ the adhesive and the vinyl, preventing any lifting or shrinking over time.